
Next.js Routing: A Complete Beginner Guide
Welcome to the world of Next.js routing! Routing is the backbone of any web application. Its invisible structure allows users to navigate seamlessly through different pages and content. It is crucial in building user-friendly and dynamic web experiences.
Next.js, a popular React framework, has consistently provided developers with a promising solution for achieving both performance and user-friendliness.
Next.js introduced a new App Router, which takes routing to the next level. It simplifies and enhances navigation in your web applications. It has features like shared layouts, nested routing, loading states, error handling, and more.
In this tutorial, we'll explore the fundamental concepts of routing for the web, including how to handle routing, what it is, how it works, and why it's important.
Let’s get started…
What Is Routing?
Routing is all about determining how an application should respond when a user requests a specific URL. When someone clicks a link or enters a URL in their browser, routing determines which code, typically a component or handler, should execute to generate the appropriate response.

It is a fundamental concept in web development that enables users to navigate through different pages or views of a web application.
In a website, different URLs often correspond to different content or functionality.
For example, a URL such as https://example.com/products generally shows a page with a list of products, while https://example.com/about leads to an "About Us" page.
Routing ensures that accurate content is displayed for each URL.
Routing Terminology
In this section, let's get familiar with some fundamental terminology:
- Route: A defined path or URL pattern corresponds to a specific page within a web application. Usually, each route has its own unique URL.
- Route Handler: A piece of code generates the content or response for a specific route. It allows us to create custom request handlers for a given route using the Web Request and Response APIs.
- Client-Side Routing: In client-side routing, the client (i.e., a web browser) ultimately manages the routing, avoiding requesting the entire web page.
- Server-Side Routing: In server-side routing, the server generates the HTML code for the requested page and then sends it to the Web Browser.
- Route Parameters: Route parameters enable dynamic values to be incorporated into the URL. For example, in the URL /products/123, "123" represents a route parameter that identifies a specific product ID.
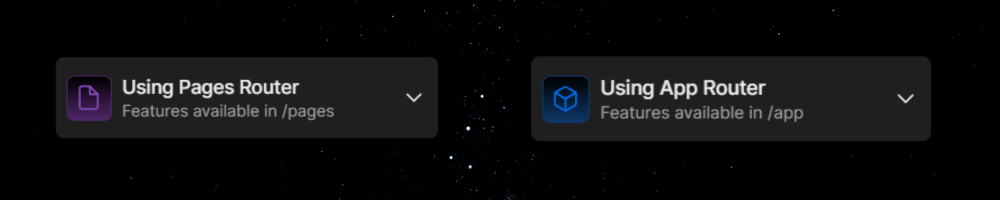
In Next.js, the Pages Router and App Router are two essential components that play a crucial role in the user's navigation. In the next section, we will provide a step-by-step guide for using the Page Router and App Router.
Pages Router vs. App Router
The generation and organization of routes are fundamental differences between the Pages Directory and the App Router. Let’s explore this difference:
- Pages Router: The Next.js project's Pages directory, found at the project's root, automatically generates routes based on the folder and file structures included therein. A separate route is associated with each file in the pages directory. For example, the pages directory has a file named about.js that generates a route that is accessible at /about.
- App Router: On the other hand, App Router arranges routes inside the app folder. It was included in Next.js version 13 and became stable and recommended in the latest release. It provides more precise control over route organization and introduces concepts like shared layouts, nested routing, and error handling.
The decision between these two highly effective routing techniques will depend on your project's needs and your understanding of the routing concept. However, the App router is recommended.
Setting Up the Pages Router
If you decide to use the Pages Router for routing in your Next.js project, follow these steps to set it up:
Create a Next.js Application: Use your terminal or code editor to run the following command to start a new Next.js application:
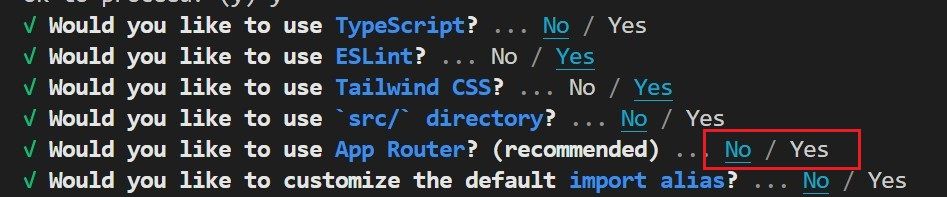
npx create-next-app your-app-nameConfiguration Options: You'll be given a list of configuration options during the application setup process, as shown in the image below. Select "No" when prompted, “Would you like to use App Router?”. This ensures that the Pages Directory is configured for your project.
Folder Structure: Once your application is created, a pages folder will appear at the project's root. This directory will be the starting point for creating your routes.
Creating routes using Pages Directory
Creating routes using the Pages Directory (i.e., Pages Router) is simple. Follow these steps:
- Create a Folder: Inside the pages directory, create a new folder with the name you want for your route. For example, you can make a folder named `About` to represent an About Us page.
- Add an index.js File: Create an index.js file inside the newly created folder. This file will contain the route content.
- Content Creation: In the index.js file, build your page's content using React components and JSX. This content will be displayed when users navigate to the /about route.
import Link from 'next/link';
export default function About() {
return (
<div className="flex justify-center items-center h-screen">
<div>
<h1 className="text-2xl font-bold mb-4">This is About Us Page</h1>
<Link className="bg-blue-500 text-white py-2 px-4 rounded-md hover:bg-blue-600" href="/">Home Page</Link>
</div>
</div>
);
}
- Linking Pages: You may use the Next.js Link component to make it easier to navigate across pages. You can build links using this component. It will help users switch between pages without requiring a page refresh.
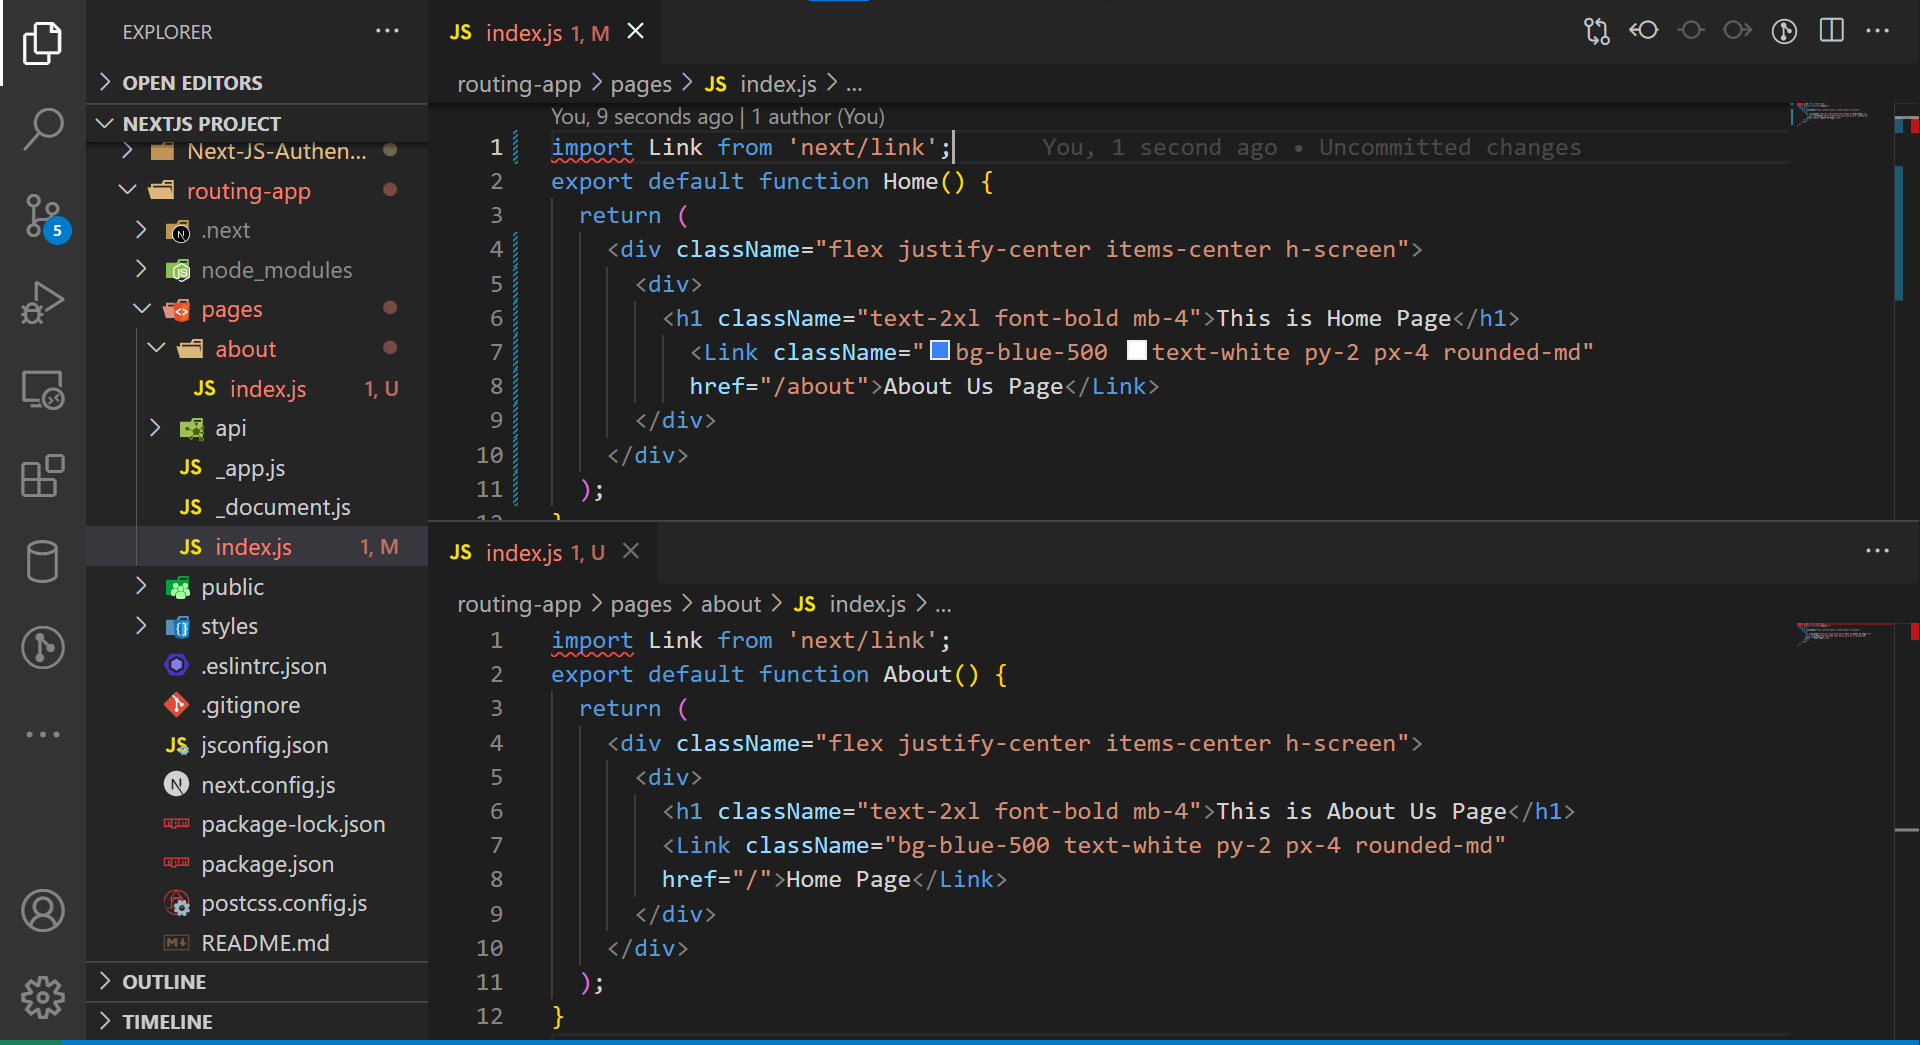
Users can seamlessly explore your site; developers will appreciate how easily routes are organized using folders.
Here's the result:

Limitations
While the Pages Directory offers an efficient way to structure routes in a Next.js application, it's important to be aware of its limitations:
- Static Exports: One of the primary limitations of the Pages Directory is static exports. The Pages Directory relies on dynamic routes generated using getStaticProps and getStaticPaths. Depending on their data requirements, not all pages within the directory can be statically exported.
- Serverless Functions: Next.js allows the creation of API routes within the Pages Directory. It can handle common API functionality, but more complex serverless functions might require additional configuration and alternative file placement.
- Statically Generated Pages Distribution: Statically generated pages may require additional CDN configuration or "vendoring" to optimize their performance and distribution to visitors.
- Edge Runtime Configuration: If you're using the Edge Runtime, you may need to configure routes beyond what's possible within the Pages Directory.
- Internationalization Routing: To implement internationalization routing effectively, you need to configure locales, default locales, and domain-specific locales. These configurations typically reside in the next.config.js file rather than being solely managed within the Pages Directory.
Understanding these limitations will help you make informed decisions when choosing between routing in your Next.js projects. Each mechanism has its own strengths and uses cases.
App Router

A new App Router was introduced in Next.js version 13.0, built on React Server Components. This supports shared layouts, nested routing, loading states, error handling, and more.
It allows you to organize your project more flexibly and efficiently. Instead of being restricted to just a "pages" folder, you can group your pages and related files within a single "app" folder.
In this section, you will learn how to create a Next.js project using the App Router and lots more about the App Router.
How to Set Up the App Router
Here's how to set it up if you choose to use the App router for routing in your Next.js project:
- Create a Next.js Application: Use your terminal or code editor to run the following command to start a new Next.js application:
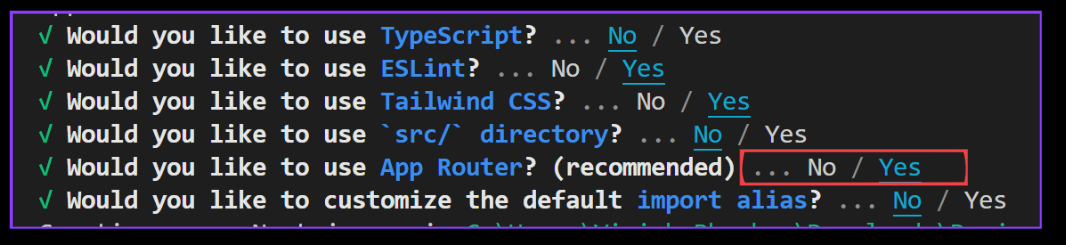
npx create-next-app@latest app-router-app- Configuration Options: During the application setup process, you'll be given a list of configuration options, as shown in the image below. Select "Yes" when prompted, “Would you like to use App Router?” This ensures that the App Router is configured for your project.
- App Router: Once your application is created, an app folder will appear at the project's root. This directory will be the starting point for creating your routes.
Before we move further into this tutorial, let’s get a quick overview of the App directory…
Roles of Folders and Files
Next.js uses a file and folder structure to create web page routes:
- Folders Define Routes: Each folder represents a different page or part of your website. The folders can be nested inside each other to create a hierarchy, just like organizing your files on your computer.
- Files Create Content: Inside these folders, files contain the actual content or user interface (UI) for each page or section.
Next.js provides a set of special files to create UI with specific behavior in nested routes. See special files:
- Layout: Shared UI for multiple pages
- Page: The content and UI for a specific webpage
- Loading: UI displayed during data loading
- Not-Found: UI is shown when a page or route doesn't exist
- Error: UI for handling errors and issues
- Global Error: UI for handling errors across the whole app
- Route: A server-side API endpoint for data and actions
- Template: Specialized layout for certain types of pages
- Default: Fallback UI when multiple routes match a URL
.js, .jsx, or .tsx file extensions can be used for special files.
Special files of a route segment are rendered in a specific hierarchy. Here it is:
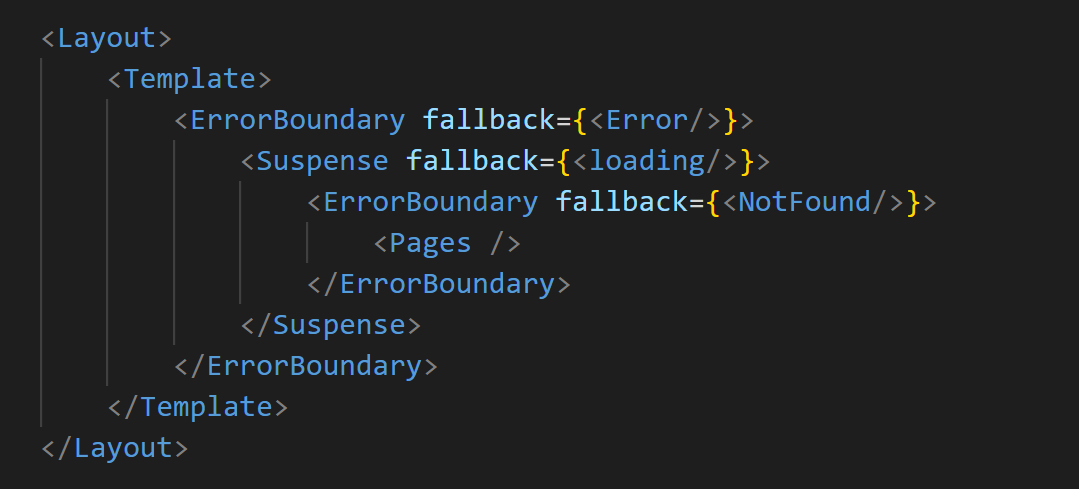
Component Hierarchy
Creating a route
To create a route for the root URL (localhost:3000), you can follow these simple steps:
- Inside the app folder, create a page.jsx file if it doesn't exist. This file will serve as the home route.
- In the page.jsx file, create or modify it with a basic React component to represent the "Home" page:
export default function Home() {
return <h1>This is Home Page!</h1>;
}By following the above steps, we have successfully created our first route. Now, open your web browser and visit localhost:3000 to see the "This is Home Page!" message.
Adding Routes
Now, Let's create two more routes: one for the About page and another for the Dashboard page.
- Create an app/about folder.
- Inside the about folder, create a page.jsx file. This file represents the route.
- On the page.jsx file, define a basic component to represent the "About Us" page:
export default function About() {
return <h1>This is About Us Page!</h1>;
}- Similarly, create an app/dashboard folder.
- Inside the dashboard folder, create a page.jsx file. This file represents the route.
- On the page.jsx file, define a basic component to represent the "Dashboard" page:
export default function Dashboard() {
return <h1>This is Dashboard Page!</h1>;
}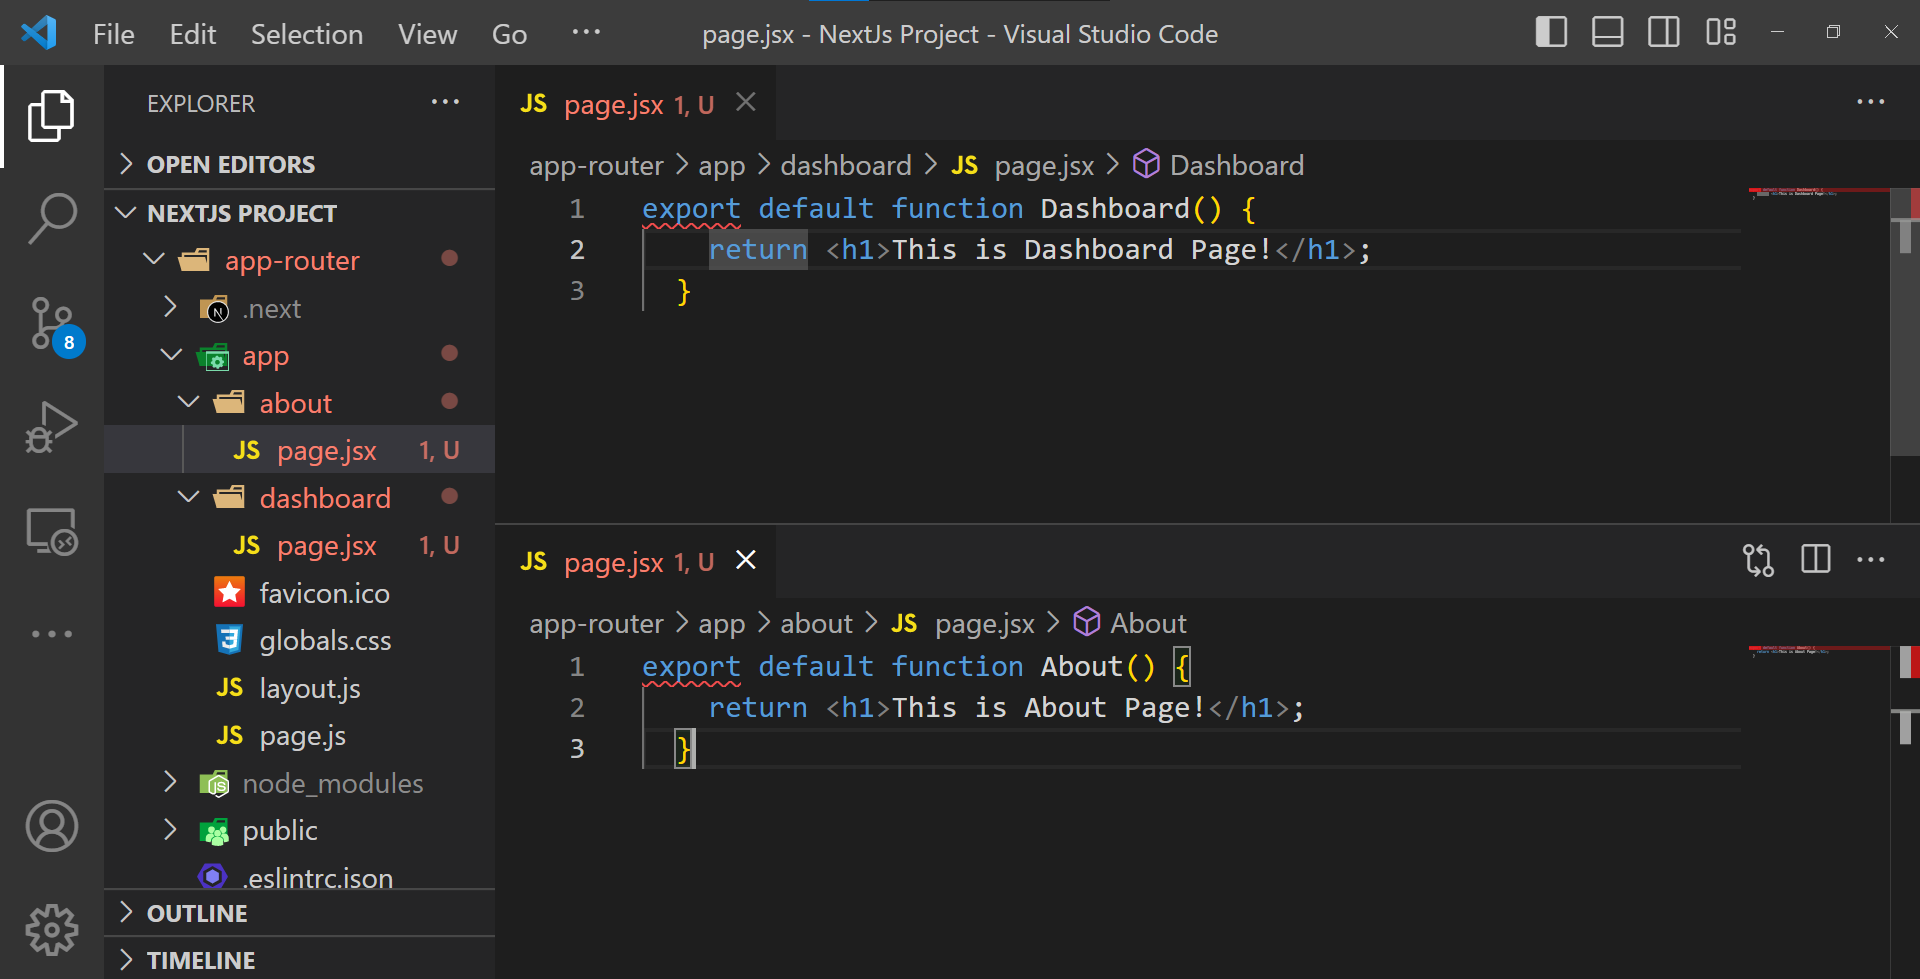
The home page will be displayed if you visit the root URL, localhost:3000. However, if you visit localhost:3000/about, the "About Us" page will be displayed. Similarly, /dashboard URL will show the "Dashboard" page.
This shows how routes are linked to files based on the name of the contained folder inside the app folder. The page.jsx file within the about folder represents /about, while the page.jsx file within the dashboard folder represents /dashboard.
Nested Route
To set up nested routes in Next.js, follow these steps:
- Create an app/blog folder or whatever name you want.
- Inside the blog folder, create a page.jsx file for the main page of the blog:
export default function blog() {
return <h1>Main Blog Page</h1>;
}- Visit localhost:3000/blog in the browser to see the "Main Blog" page.
- To implement /blog/firstPage and /blog/secondPage routes, create page.jsx files in the app/blog/firstPage and app/blog/secondPage folders with the following code:
export default function firstPage() {
return <h1>Blog First Page</h1>;
}export default function secondPage() {
return <h1>Blog Second Page</h1>;
}The folder structure will look like this:
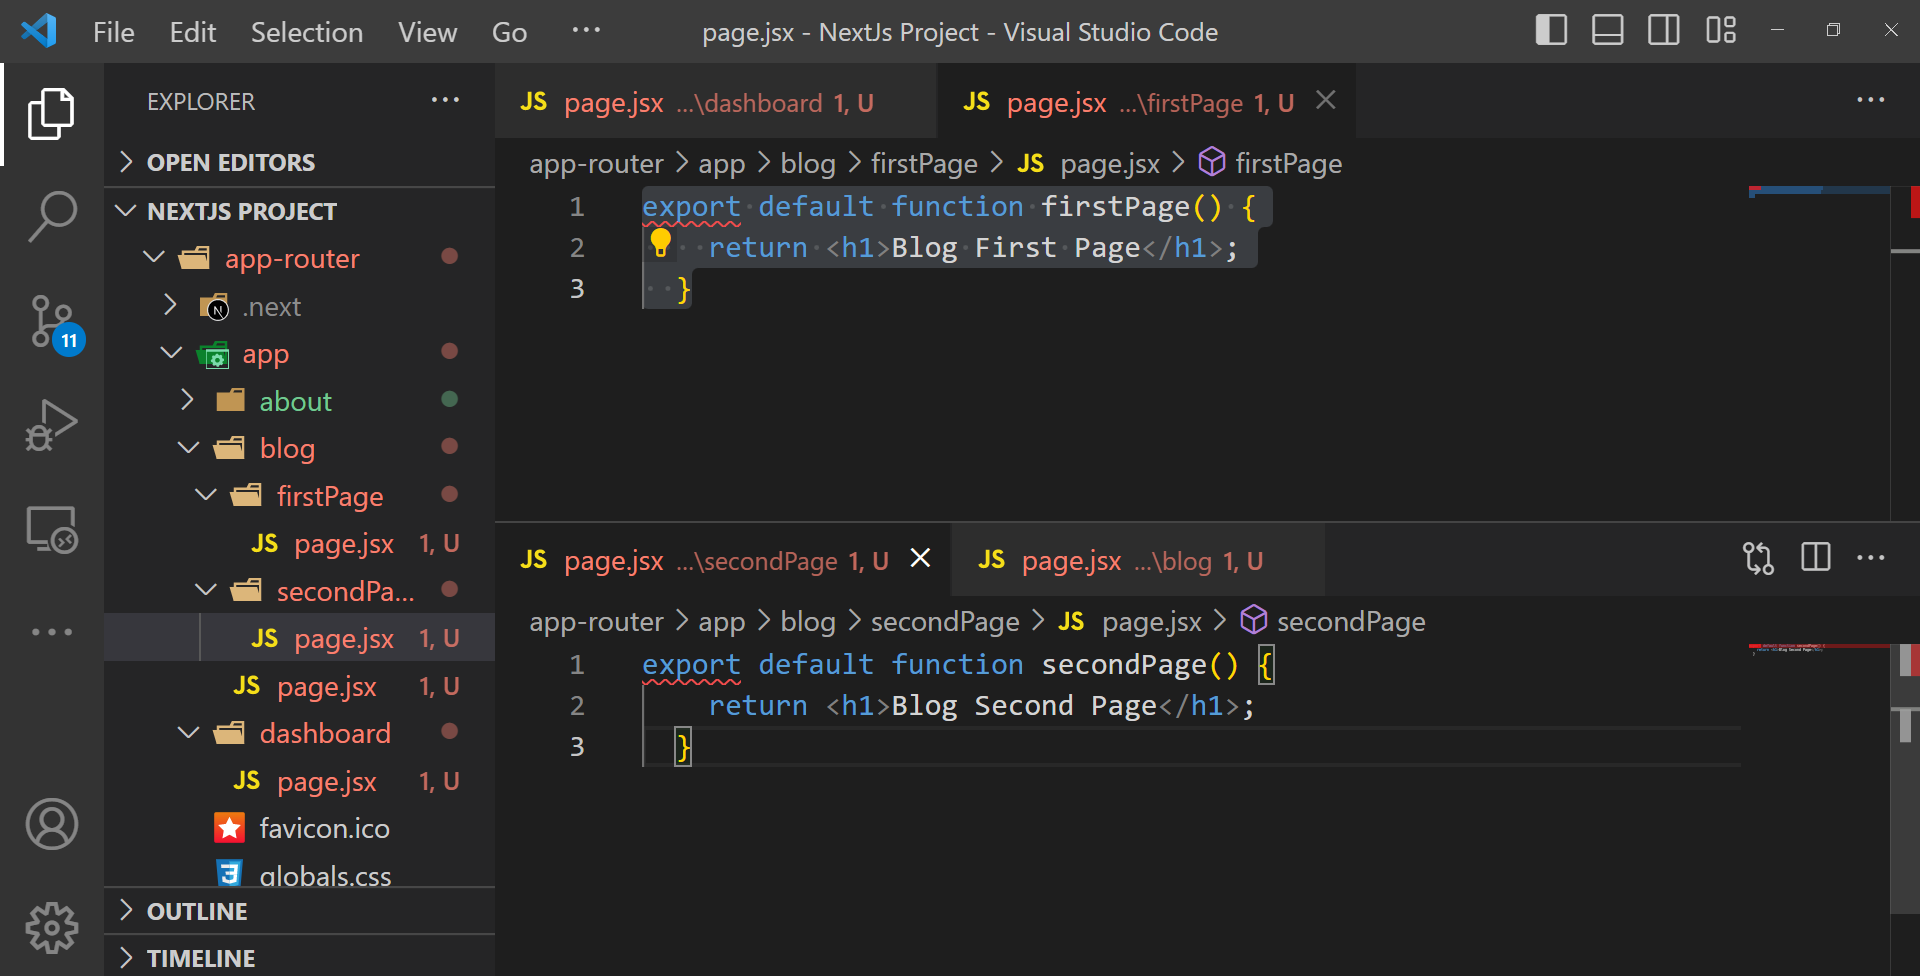
- Now, when you navigate to localhost:3000/blog/firstPage, you'll see the first page of the blog post, and localhost:3000/blog/secondPage will display the second page of the blog post.
Next.js automatically handles the routing by organizing the files in a nested folder structure. This simplifies the process of creating nested routes and improves the application's overall organization and structure.
Dynamic Route
To set up dynamic routes in Next.js for a product listing and detail page, follow these steps:
- Create an app/products folder.
- Inside the products folder, create a page.jsx file to display a list of the products:
export default function ProductPage() {
return (
<>
<h1>Product List</h1>
<h2>Product 1</h2>
<h2>Product 2</h2>
<h2>Product 3</h2>
</>
);
}Visit localhost:3000/products in the browser. The Products list will be displayed on the screen.
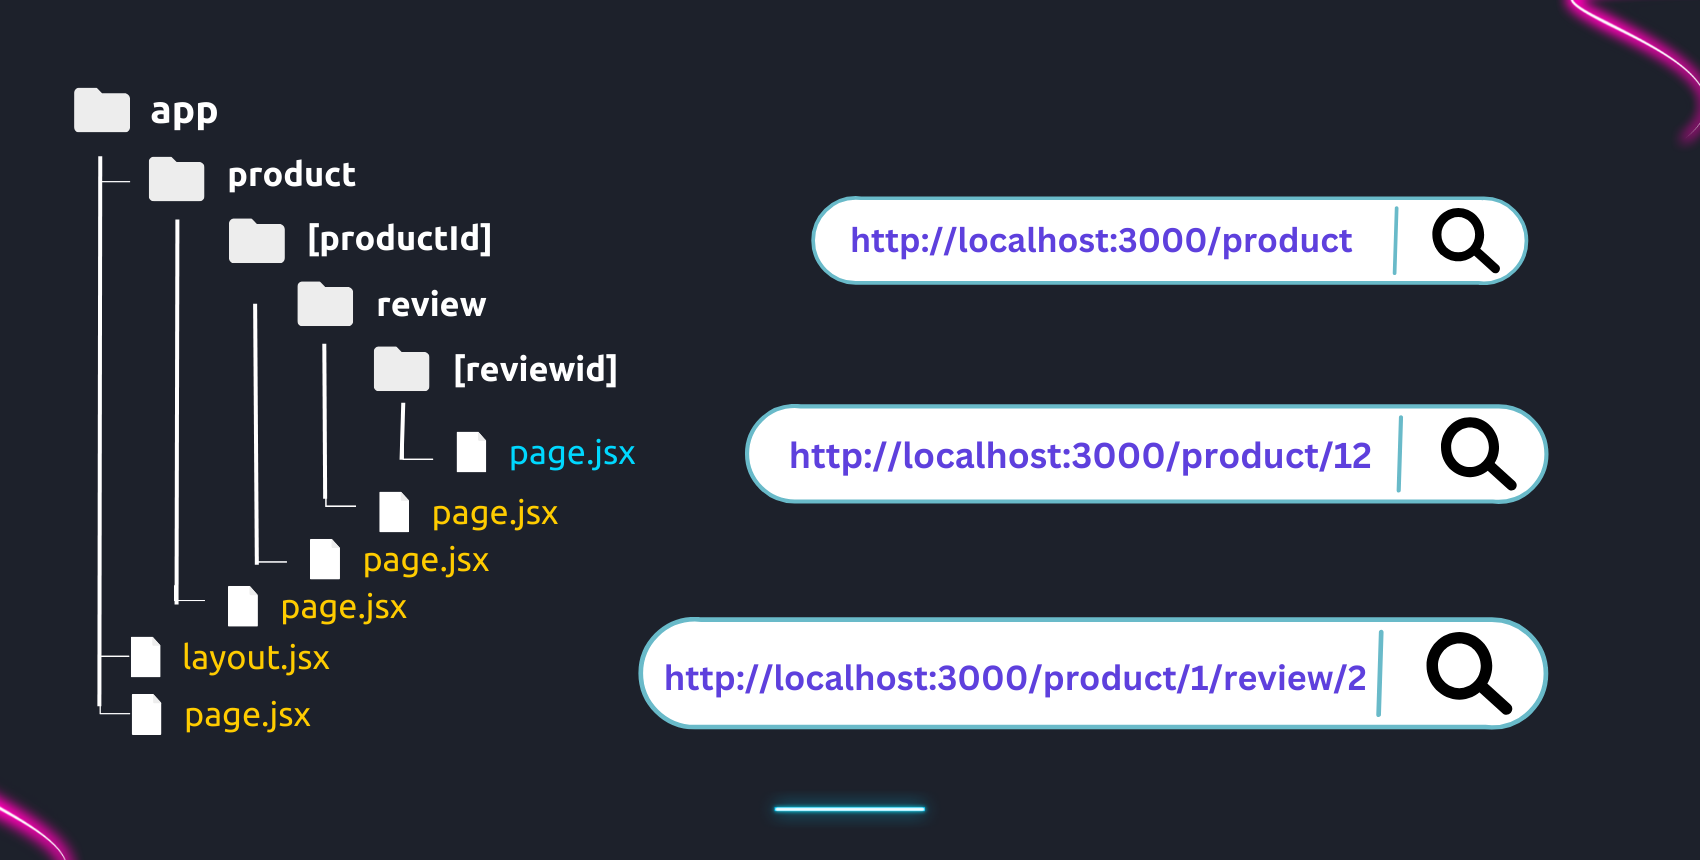
- For the product detail page, create a new folder within the products folder and name it [productId]. The square brackets indicate a dynamic route.
- Inside the [productId] folder, create a page.jsx file:
export default function DetailPage() {
return <h1>Product Detail Page</h1>;
}- When you navigate to localhost:3000/products/1, you'll see the product details page. Similarly, accessing /products/2, /products/3, or even /products/100 will display the same details page. [productId] is the dynamic route segment that can adapt values like 1, 2, 3, etc.
- To display the specific product ID, use the params object to display on each page. Modify the code as below:
export default function DetailsPage({params}){
return(
<div>
<h1>Product Details</h1>
<h2>Details About Product : {params.productId}</h2>
</div>
)
}When you navigate to localhost:3000/products/1, you'll see "Details about product 1" displayed. Similarly, /products/100 will show details about “Product 100."
Dynamic routes help create list-detail patterns in UI apps. By learning to create dynamic routes in Next.js, you can create flexible and scalable applications that adapt to varying user interactions.
Nested Dynamic Route
In the previous section, we covered dynamic routes, and now, we'll learn about nested dynamic routes.
Nested dynamic routes in Next.js allow us to create complex and dynamic URL structures by combining multiple dynamic route segments.
For example, when visiting/products/1, users expect to view details for product 1. Likewise, visiting /products/1/reviews/1 should show the first review of that product.
We'll explore how to achieve this using the App Router.
To create nested dynamic routes in Next.js, follow these steps:
- Create an app/products/[productId]/reviews folder. This structure leads to the route "/products/productId/reviews." We also need a dynamic reviewId to show specific reviews.
- Within the reviews folder, create a new folder named [reviewId]. Once again, the square brackets indicate a dynamic route.
- Inside the [reviewId] folder, create a page.jsx file, here we'll create a component to display both the productId and the reviewId of the product:
export default function ReviewPage({params}){
return(
<div>
<h1>Review Page</h1>
<h2>Product Id : {params.productId}</h2>
<h2>This is Review : {params.reviewId} of Product : {params.productId}</h2>
</div>
)
}Now, you'll see the expected content displayed by navigating to localhost:3000/products/1/reviews/1 in the browser.
Similarly, exploring other product IDs and review IDs will dynamically show the relevant values in the user interface.
Handling Non-Matching Route
Next.js will automatically respond with an Error: 404 Not Found response when you provide a URL not available within the app folder, such as /profile. Since Next.js takes care of this for you, you don't need to manually handle non-matching routes.
Advanced Features of App Router in Next.js
The App Router in Next.js offers advanced features that go beyond what we've discussed so far. It includes features such as file colocation, private folders, router groups, server actions, data revalidation, parallel routes, and route interception, which enhance the functionality of your application.
For a better understanding and mastery of these features, you can refer to the official Next.js documentation, which provides comprehensive information on these features in Next.js.
Conclusion
Routing is a core part of web development, providing the structure that allows users to navigate between pages and content.
In this tutorial, we covered the fundamentals of routing in Next.js, focusing on the App Router introduced in Next.js 13. We explored routing terminology, special files, static and dynamic routes, and the key differences between the App Router and the Pages Router.
With this understanding, you now know how Next.js organizes routes and when to use the App Router or the Pages Directory based on the project's needs.
Related Articles

Musharof
Compatibility Issues with Next.js 15: npm install --legacy-peer-deps
You may have noticed that we've already updated all our templates to Next.js 15. While this puts us slightly ahead of th
Read More
Musharof
All templates, boilerplates, and starter kits are now updated to Next.js 16.0.10
We’re excited to announce an important upgrade for our Next.js Templates users. All templates available on Next.js
Read More
Sumaiya Afrin Kanak
7+ Best AI Website Templates for 2026 - Agents, Chatbots, Starter Kits
Do you know what the new trend is in building an AI website ? You must have guessed it by now! Yes, it is the AI websit
Read More